Products
Manufacturers
Solutions
Published
4 June 2026
Written by Yunus Unal Mechatronics Engineer and Content Specialist
Yunus is a mechatronics engineer with a background in 5G mobile communications and intelligent embedded systems. Before joining TKO and ipXchange, he developed and tested IoT and control-system prototypes that combined hardware design with embedded software. At ipXchange, Yunus applies his engineering knowledge and creative approach to produce technical content and product evaluations.
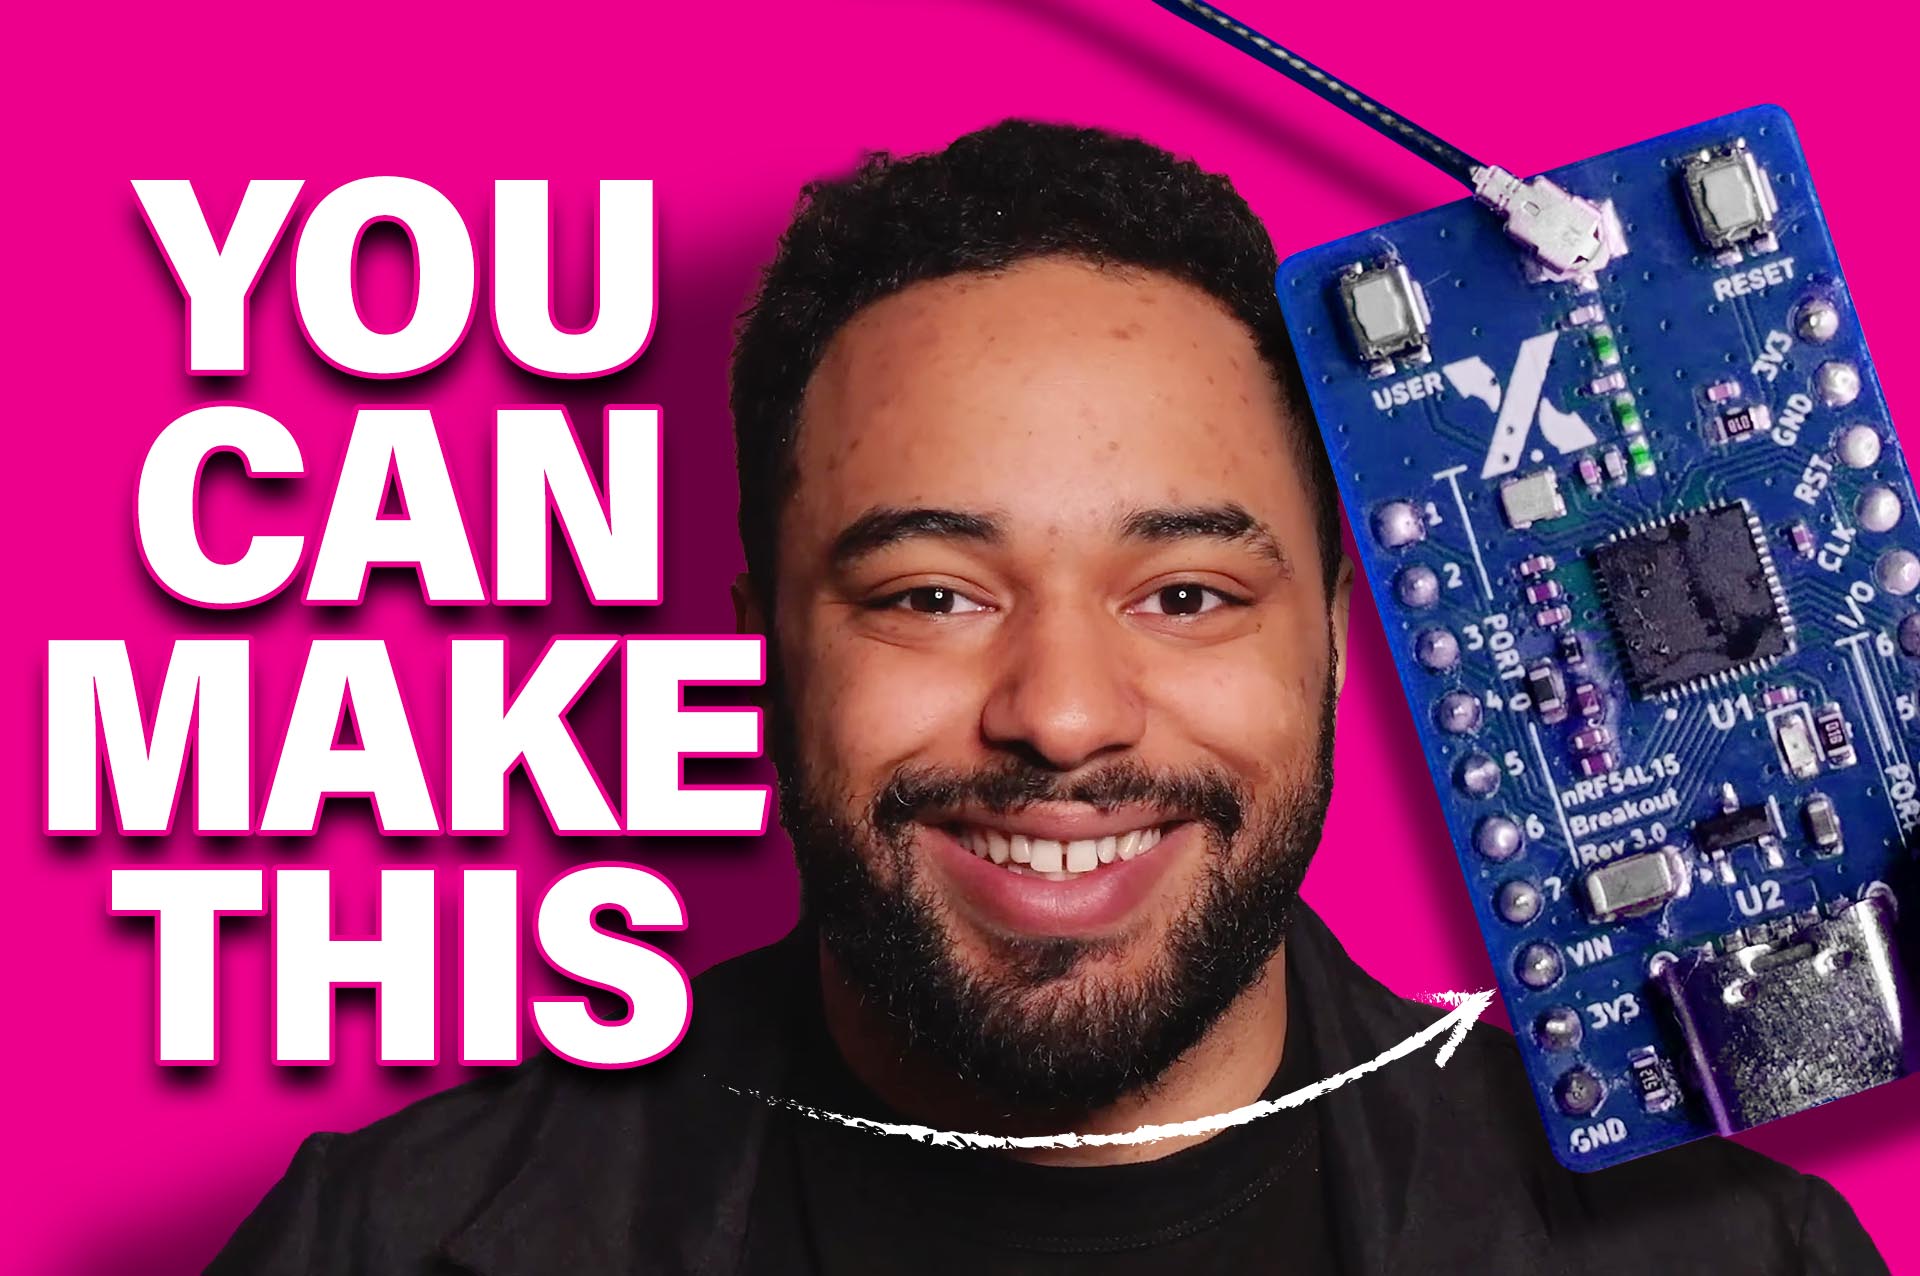
Moving from an evaluation kit to a custom PCB is one of the most important steps in embedded hardware development. Evaluation kits are designed to make testing easy, but real products need their own board, their own layout, and their own hardware configuration.
In this ipXchange project, we took that journey ourselves by building an nRF54L15 custom PCB based on Nordic Semiconductor’s hardware ecosystem. The goal was simple: create a breakout board, bring it up, flash it, test Bluetooth connectivity, and verify that the GPIO, LEDs, and buttons worked as expected.
The process was not completely smooth, which is exactly why it is useful.
Why We Chose the nRF54L15
The first step in any good engineering project is research. For this build, the team chose Nordic Semiconductor’s nRF54L15 because of its strong support ecosystem.
Nordic provides solid datasheets, reference designs, training materials, software tools, and a large developer community. One of the most useful resources is Nordic DevZone, where engineers can raise technical issues, ask questions, and even share designs confidentially with Nordic engineers.
That support was not just a nice extra. It became an important part of the debugging process later in the project.
Setting Up the Development Environment
Before designing the hardware, the software environment needed to be prepared. The project used nRF Connect for VS Code, along with the correct Nordic software development kit, toolchain, board directories, and build settings.
The team also used KiCad for PCB design. Since the aim was to create a breakout board, the design process could start directly from a schematic rather than a full block diagram.
The schematic was based on Nordic’s reference design, but simplified for the specific breakout board. Unneeded sections were removed, required functions were retained, and the design was translated into a custom bill of materials and PCB layout.
From Schematic to PCB
Once the schematic was ready, the design moved into PCB layout. KiCad generated the board view from the schematic, but the physical component placement and routing still had to be handled manually.
This stage is where small mistakes can become major issues. Poor trace routing, incorrect assumptions about crystals, power rails, antennas, or debug connections can all stop a custom PCB from working correctly.
After layout, the PCB was fabricated by a third party. Headers and selected components were soldered manually, giving the team a physical board ready for bring-up.
At this point, the hardware existed, but it was still just an empty shell. The next challenge was software.
Configuring Zephyr RTOS for Custom Hardware
Nordic’s software flow uses Zephyr RTOS, which provides a useful hardware abstraction layer. This means the same application logic can be moved between development kits and custom boards, provided the hardware is correctly described.
For this nRF54L15 custom PCB, the team created a new custom board definition inside nRF Connect for VS Code. This involved setting a board name, vendor details, board directory, and selecting the correct chip.
However, the generated custom board files were only a starting point. The peripherals still needed to be enabled, pins assigned, LEDs named, buttons configured, and the device tree updated.
Rather than editing everything manually in DTS and DTSI files, the team used the device tree GUI after creating a build configuration. This allowed the GPIO pins and peripherals to be configured more clearly.
Testing Bluetooth, GPIO, LEDs, and Buttons
To verify the board, the team created a simple test application.
The status LED followed a repeating pattern to confirm basic board operation. Two external LEDs were connected to GPIO pins to test breakout functionality. One LED responded to a physical button, while another responded to a Bluetooth command from nRF Connect Mobile.
If all three tests worked, the board could be considered functional.
But before success came debugging.
The Flashing Problem
The custom board was recognised by the programmer and by VS Code, but flashing did not work reliably. Sometimes flashing appeared successful, but nothing happened on the board. At one point, a previous blinky program appeared to start running much later, which initially suggested a possible brownout or power issue.
The team investigated power behaviour, tried more complex software, and continued debugging, but the issue was not obvious.
This is where Nordic DevZone proved valuable. The schematic and bill of materials were submitted confidentially for review by Nordic engineers.
After several days of back and forth, the root cause was found.
The Crystal Configuration Mistake
The issue came from an early design decision. The board used a 32 MHz crystal to support Bluetooth connectivity. That was not wrong by itself. However, Nordic’s reference design also assumed the presence of a 32.768 kHz crystal.
Because the custom board definition was based on that reference design, the software expected a low frequency crystal that was not actually present on the PCB. This caused communication and flashing problems.
Once the issue was identified, the fix was straightforward. The device tree was updated to disable the expectation of the external 32.768 kHz crystal and use the internal timer instead.
After that change, the board flashed correctly and the test application worked as intended.
What Engineers Can Learn From This
This project highlights a key lesson in embedded hardware design: reference designs are incredibly useful, but they carry assumptions. If your custom hardware deviates from the reference design, your software configuration needs to reflect that.
The nRF54L15 custom PCB worked in the end, but only after the hardware and Zephyr configuration were aligned properly. The final board successfully demonstrated LED behaviour, GPIO control, button input, and Bluetooth communication through nRF Connect Mobile.
For engineers moving from evaluation kits to custom hardware, this project shows the importance of good documentation, strong vendor support, and a clear bring-up plan.
The hardware may look finished when the PCB arrives, but the real engineering begins when you try to flash it.
Learn More about Nordic Semiconductor: https://www.nordicsemi.com/
DevAcademy: https://academy.nordicsemi.com/courses/nrf54l-series-express-course/
Devzone: https://devzone.nordicsemi.com/
Comments are closed.
Comments
No comments yet